Tag: Kitchen lighting

  • Why the Right Lighting Matters

    Why the Right Lighting Matters

    Soros-Pen-Island

    Many homeowners don’t realize just how significant a role lighting plays in the look and feel of every room in a home.

    While it should be a primary concern, lighting is often a last-minute addition to an otherwise carefully calculated home design.

    Lighting can make or break a perfectly coordinated room. The beauty of your furniture, the style of the art on the walls and the sleekness of your floors and counters won’t matter if the lighting design does not highlight everything in the proper way.

    It is key homeowners recognize that lighting serves a far greater purpose than simply allowing us to see when it’s dark outside. Lighting has a profound effect on the mood and function of any room, and it can determine how the area is perceived by those within it.

    People have no desire to spend time in poorly lit spaces. They may not necessarily realize why they prefer one area of a home over another, but lighting tends to play a key role. Rooms that create uncomfortable glares or are too dark will cause melancholy moods. They can also cause people to strain their eyes, leading to uncomfortable headaches.

    A well-lit room, on the other hand, will do the opposite. Good lighting can enhance people’s moods and contribute to happier, healthier vibes throughout your home.

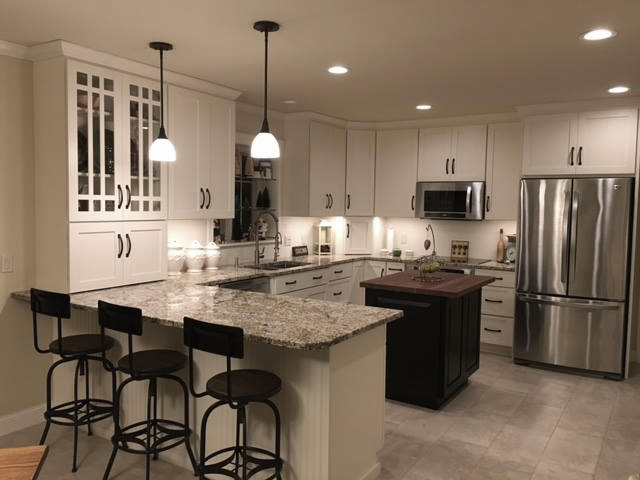
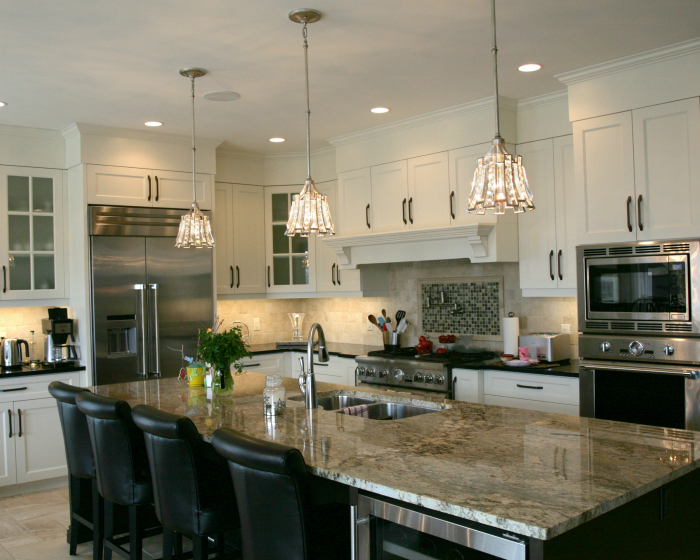
    How lighting changes a space 
    There are so many ways that light will change a space, including how large or small it feels, the function it serves, as well as its mood and depth.

    When it comes to size, light can be used to make a large room feel smaller and cozier, or a small room feel less confined. Darker rooms typically feel more cramped, so using a lighting effect, such as directional recessed spot lighting to reflect off the walls and make them brighter will add a feeling of openness to a small space. Additionally, you can use multiple circuits to break up a larger space.

    Rooms that are designated for specific tasks, like reading, doing homework or cooking, should include task lighting over the area. You can also use spot lighting to highlight a specific element in a room, like a work of art or an especially beautiful piece of furniture.

    The best rooms, however, involve multiple types of lighting that create a layering effect. This gives the room depth.

    Layering and depth
    Layering involves utilizing not only a variety of lighting types, but also a variety of fixtures. You can create a beautifully textured lighting scheme when you use a combination of lamps, recessed lighting, wall-mounted lights and more. All of this will contribute to the personality of the room.

    Once you gain an understanding of exactly what kind of light each fixture gives off, you will be able to create the precise atmosphere you desire. When experimenting with lighting design, you also have to remember that light creates shadows and reflections. These can also contribute strongly to the design of a room. When choosing a type of lighting, make sure to consider the type of shadow it casts and whether it will be a positive or negative addition to a room.

    Have questions?  We offer a free lighting consultation!  Call us at 603-448-2066 or stop in today!

    Join our email list to receive a 10% off coupon!  

  • 8 Steps to Install a Pendant Lighting Fixture

    8 Steps to Install a Pendant Lighting Fixture

    If you’ve decided to add some elegance to your home lighting design with pendant light fixtures, you might be wondering how to install them. Luckily, pendant lights are not extremely difficult to install, and most avid do-it-yourself people can get it done within an hour or two.

    CLDKitchen

    Here are eight easy steps to install a pendant light fixture:

    1. Cut the Power
    Remember, if you’re not comfortable working with your home’s electrical wires, you should contact a professional for help. However, for those who are up for the challenge, the first thing you need to do is turn off the power through your fuse box to the room you’ll be working in. Always make sure to test the power outlets for a current before you start doing anything.

    2. Take Out Your Old Fixture
    More than likely, you have a ceiling light already in place, and this makes it easy to simply remove the light fixture and base or trim. Once you have an empty hole in the ceiling, you’re ready to put in your new fixture. If you don’t have a ceiling fixture, you will likely want to speak with a professional before cutting into your ceiling.

    3. Check for the Support Beam
    In the hole, you want to make sure there’s a support beam that can hold the pendant light fixture. If not, you’re putting too much weight on your ceiling, which could collapse. If you do not have a beam, you will have to forego the installation process on your own because it could be a building code violation.

    4. Connect the Wires
    Inside the hole where the old light fixture once was should be the wires that were previously connected to the other fixture. You can follow the guidelines on the light fixture’s installation instructions, which usually means connecting black wires to black wires and white to white. You may need to cut and strip the wires to give optimal connection space. Make sure wire connectors hold the two leads together. Your fixture should come with these connectors, but if not, they are available at any hardware store.

    5. Find the Ground Wire
    Before you finish the wiring, it’s critical to find the ground wire, which is usually green or copper colored. Attach the ground wire to the ground screw on the junction box, and tighten the screw to hold it in place.

    Ensure all wires are connected or secured through wire nuts before pushing the wires back into the ceiling.

    6. Add Your Mounting Bracket
    To ensure your pendant will not fall, add the mounting bracket to the support beam. This can be attached with screws, and it’s important to follow the manufacturer’s instructions to set up the light correctly.

    7. Finish Installing the Canopy or Base
    Once you have the support bracket and the wires connected, you want to finish by installing the canopy or base. This piece likely requires screws to hold it in place. Try to set it up like the previous base you removed earlier in this process.

    8. Add a Bulb and Test Your Light
    Once the pendant is able to hang freely, you want to install a light bulb and test the fixture to make sure it works by flipping the fuse box switch back on. If the light does not come on, you need to turn the power off again, and check your wiring, as that is usually the most common problem.

    We have a wide variety of pendant lights available in our showroom!  Stop in and take a look, and remember if you’ve found something that you like online-we’ll match the price!